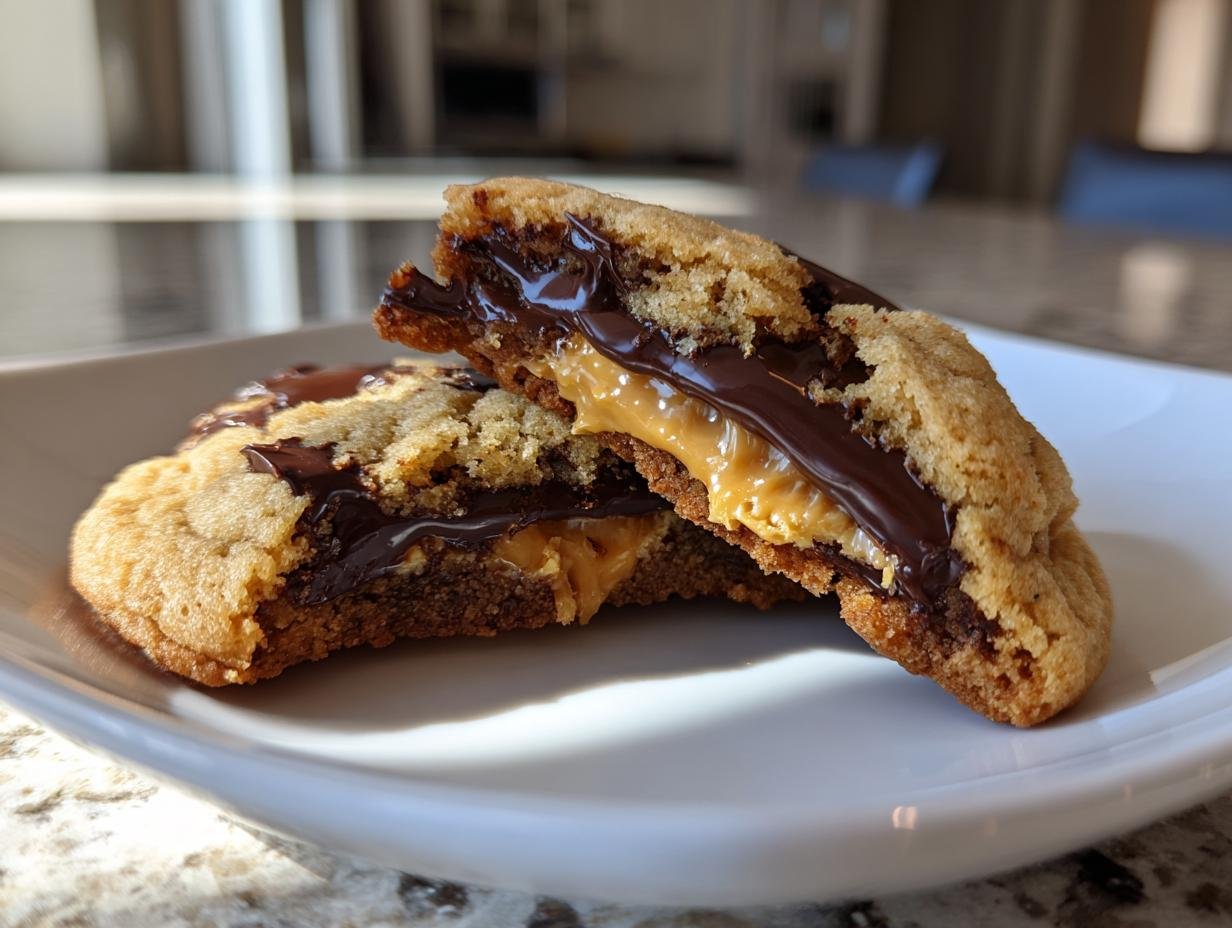
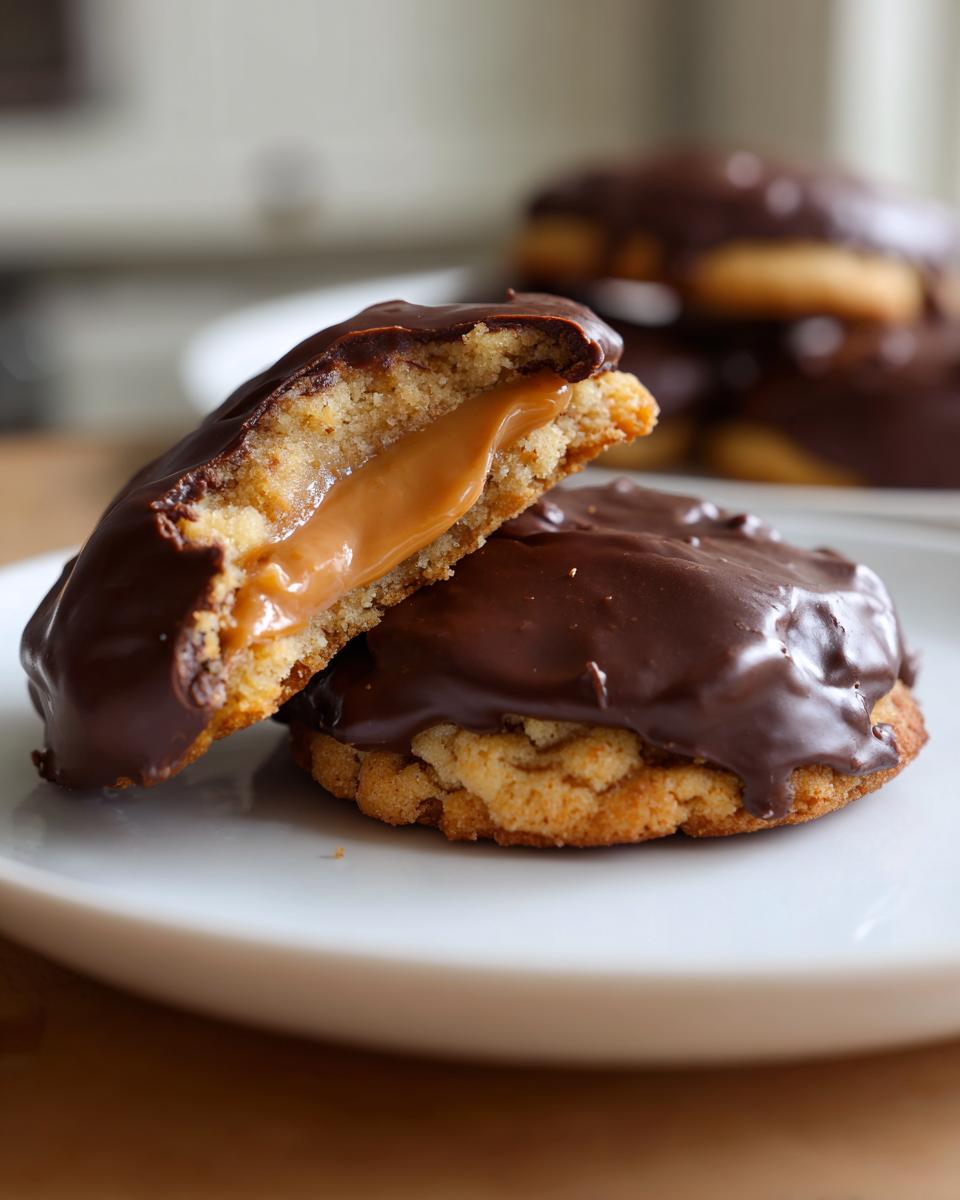
Oh, let me tell you about the joy of making *Homemade Tagalong Cookies*! There’s something so magical about the combination of a buttery cookie, creamy peanut butter filling, and rich chocolate coating that just makes my heart sing. I remember the first time I baked these cookies; I was trying to recreate a childhood favorite from the Girl Scouts, and boy, did it turn into a delightful adventure! My kitchen was filled with the warm scent of baking cookies, and I couldn’t help but sneak a few bites of the peanut butter filling—seriously, how can you resist? Each step was an experience, from creaming the butter and sugar to dipping those cookies into velvety chocolate. Trust me, when you take that first bite of a Homemade Tagalong Cookie, the burst of flavors will transport you back to simpler times, making every crumb worth it. So grab your apron and let’s dive into this deliciously nostalgic treat—it’s time to make some memories!
Here’s what you’ll need to whip up these delightful *Homemade Tagalong Cookies*. I promise, each ingredient plays a vital role in creating that scrumptious flavor and texture.
1 cup (226g) unsalted butter, at room temperature – This is the foundation of your cookie base, adding that rich, buttery flavor we all love.
2/3 cup (126g) granulated sugar – This sweetens the dough and helps create that lovely, tender crumb.
2 large egg yolks – These add richness and help bind everything together.
2 teaspoons (10ml) pure vanilla extract – A splash of vanilla is a must for that warm, comforting aroma.
2 ½ cups (350g) all-purpose flour – This is your main dry ingredient, giving structure to your cookies.
½ teaspoon salt – Just a touch enhances all the flavors and balances the sweetness.
6 tablespoons unsalted butter, at room temperature (for filling) – This makes the peanut butter filling creamy and dreamy.
1 ¼ cups creamy peanut butter – Use your favorite brand for that irresistible peanut flavor!
1 ¼ cups powdered sugar, sifted – This sweetens the filling and gives it that perfect, smooth consistency.
1 teaspoon pure vanilla extract (for filling) – It’s like a secret ingredient that elevates the peanut butter flavor.
3 bags (10oz) Ghirardelli dark chocolate melting wafers – These are the magic touch for coating your cookies in luscious chocolate.
Gather these ingredients, and you’ll be well on your way to creating a batch of cookies that’ll impress everyone you share them with!
How to Prepare Homemade Tagalong Cookies
Alright, let’s roll up our sleeves and dive into making these amazing *Homemade Tagalong Cookies*! I promise you, it’s a fun process that leads to delicious rewards. Follow these steps, and you’ll be a cookie superstar in no time!
Preparing the Cookie Dough
First things first, let’s get that cookie dough ready! In a stand mixer, you’ll want to start by combining the room temperature unsalted butter and granulated sugar. Beat them together on medium speed until the mixture is light and fluffy—this usually takes about 2-3 minutes. You want to see a nice pale color here, which means you’re on the right track. Then, add in those two large egg yolks and the vanilla extract, beating until everything is well combined.
Next, it’s time to mix in the dry ingredients! Gradually add the all-purpose flour and salt to your butter mixture. Don’t rush this part; mix just until the dough starts to come together. You want a soft, slightly sticky dough that holds its shape without being too crumbly. If it feels too wet, sprinkle in a bit more flour, but be careful not to overmix!
Chilling the Dough
Now, here’s where the magic of chilling comes in. Turn the dough out onto some parchment paper, divide it into two halves, and shape each half into a log. Wrap these logs in plastic wrap and pop them in the fridge for at least 45 minutes. Chilling the dough is essential because it firms it up, making it easier to slice and ensuring your cookies hold their shape when they bake. Plus, the flavors get a chance to mingle, which is always a good thing!
Baking the Cookies
Once your dough has chilled, preheat the oven to 350°F (175°C) and line a cookie sheet with a silicone mat. Slice the chilled dough into ¼ inch thick rounds—aim for uniform sizes so they bake evenly. Place the cookies on the prepared baking sheet, leaving a little space between each one. Bake them for 11-13 minutes, just until the edges start to turn golden. They might look a bit soft in the middle, but don’t worry; they’ll firm up as they cool! Let them cool on the baking sheet for about 10 minutes before transferring them to a wire rack to cool completely.
Making the Peanut Butter Filling
While your cookies are cooling, let’s whip up that dreamy peanut butter filling! In a mixing bowl, combine the room temperature butter, creamy peanut butter, sifted powdered sugar, and the teaspoon of vanilla extract. Beat until it’s completely smooth and creamy—this shouldn’t take long, just a couple of minutes. You want it to be spreadable but not too runny, so if it feels a bit thick, you can add a splash of milk to loosen it up a bit.
Dipping in Chocolate
Now comes the fun part—dipping those cookies in chocolate! Melt the Ghirardelli dark chocolate melting wafers in a microwave-safe bowl, heating in 30-second intervals and stirring in between until it’s completely smooth. You want a nice, velvety consistency that will coat the cookies beautifully. Once melted, take each cooled cookie and dip it into the chocolate, making sure to cover the entire surface. Allow any excess chocolate to drip off before placing the cookies on a baking sheet lined with parchment paper to set. You can pop them in the fridge for a few minutes to speed up the setting process if you’re feeling impatient!
And there you have it! Your *Homemade Tagalong Cookies* are ready to be enjoyed. Just try to resist the urge to eat them all in one sitting—though I won’t judge if you do!
Why You’ll Love This Recipe
Let me tell you, there are so many reasons to adore these *Homemade Tagalong Cookies*! From the rich flavors to the simple preparation, every bite is a reminder of why baking is such a joyful experience. Here’s why you’ll fall in love with this recipe:
Rich Flavor: The combination of buttery cookies, creamy peanut butter, and luscious chocolate creates an explosion of flavors in every bite. It’s the perfect balance of sweet and salty!
Easy to Prepare: With straightforward steps and simple ingredients, this recipe is accessible even for novice bakers. You don’t need fancy equipment—just a mixer and some patience!
Customizable: Feel free to experiment with different types of nut butters or chocolates. You can even sprinkle sea salt on top for an added flavor twist!
Perfect for Sharing: These cookies make for fantastic gifts or treats to share at gatherings. Everyone loves homemade goodies, and these will definitely impress!
Homemade Satisfaction: There’s something incredibly rewarding about baking from scratch. The aroma that fills your kitchen and the joy of sharing your creation with loved ones make it all worthwhile.
Trust me, once you try these cookies, you’ll be hooked and want to make them again and again! It’s not just about the taste; it’s about the love and memories that come with every batch.
Tips for Success
Alright, let’s make sure your *Homemade Tagalong Cookies* turn out perfectly every time! Here are some pro tips I swear by that can help elevate your cookie game:
Use Quality Ingredients: The better the ingredients, the better the cookies! I always recommend using high-quality unsalted butter and creamy peanut butter. It makes a noticeable difference in flavor.
Room Temperature Ingredients: Make sure your butter and eggs are at room temperature before starting. This helps create a smoother dough and ensures everything mixes together beautifully. Trust me, it’s worth the extra planning!
Don’t Skip the Chilling: Chilling your dough is crucial for the best results. It not only makes the dough easier to slice but also helps prevent the cookies from spreading too much while baking. If you’re short on time, you can chill for 30 minutes, but an hour is ideal!
Watch the Baking Time: Every oven is a little different, so keep an eye on your cookies as they bake. You want them lightly golden around the edges and slightly soft in the center. Overbaking can lead to dry cookies, and we definitely want to avoid that!
Let Them Cool: Give your cookies a chance to cool on the baking sheet for about 10 minutes before transferring them to a wire rack. This helps them firm up a bit and makes handling them much easier!
Experiment with Flavors: Feel free to get creative! You can add a pinch of cinnamon or even some chopped nuts to the cookie dough for a twist. And don’t hesitate to try different chocolate types for coating—milk chocolate or white chocolate can be delicious alternatives!
Store Properly: To keep your cookies fresh, store them in an airtight container in the refrigerator. They’ll last longer that way, and trust me, they’re even better after chilling for a day or two!
With these tips in your back pocket, you’ll be well on your way to cookie perfection. Get ready to impress your friends and family with these delightful treats, and most importantly, have fun baking!
Nutritional Information Section
Curious about the nutritional goodness packed into each *Homemade Tagalong Cookie*? Here’s a quick breakdown of the estimated values per cookie. Keep in mind that these numbers are based on typical ingredients used and can vary slightly depending on what you choose:
Calories: 338
Fat: 22.3 g
Saturated Fat: 8.5 g
Trans Fat: 0 g
Cholesterol: 32.1 mg
Sodium: 78.9 mg
Carbohydrates: 30.7 g
Fiber: 2.7 g
Sugar: 18.5 g
Protein: 4.8 g
With these delightful cookies, you get a satisfying treat that’s perfect for sharing—just remember to enjoy them in moderation!
FAQ Section
Got questions about making the perfect *Homemade Tagalong Cookies*? Don’t worry; I’ve got you covered! Here are some common questions I hear, along with my best answers to help you out:
Can I use natural peanut butter instead of creamy peanut butter? Absolutely! Just keep in mind that natural peanut butter has a different consistency and may not be as smooth as commercial brands. If you go this route, you might need to adjust the amount of powdered sugar to achieve the right filling consistency.
What can I use if I don’t have dark chocolate melting wafers? No problem! You can substitute with almond bark or even milk chocolate chips if you prefer a sweeter coating. Just make sure to melt them carefully and stir until smooth for that perfect dip!
How can I store my leftover cookies? To keep your *Homemade Tagalong Cookies* fresh, store them in an airtight container in the refrigerator. They’ll last for about a week, but trust me, they’re best enjoyed within the first few days. If you can resist, they actually taste even better after chilling for a day!
Can I freeze these cookies for later? Yes! These cookies freeze beautifully. Just place them in a single layer on a baking sheet to freeze them first, then transfer them to an airtight container or freezer bag for longer storage. They can last up to 3 months in the freezer. Just thaw them in the fridge before enjoying!
What’s the best way to ensure my cookies don’t spread too much while baking? Chilling the dough is key! Make sure you follow the chilling instructions and slice the cookies while the dough is still cold. This helps them maintain their shape and results in perfectly baked cookies every time!
Hopefully, these answers help you tackle any challenges you might face while making your *Homemade Tagalong Cookies*. Happy baking!
Storage & Reheating Instructions
Once you’ve baked your delicious *Homemade Tagalong Cookies*, you’ll want to make sure they stay fresh and tasty for as long as possible. Here’s how to store them properly so you can enjoy them later!
First off, to keep your cookies at their best, store them in an airtight container. I usually recommend using a container lined with parchment paper to help absorb any moisture and prevent them from getting too soft. You can keep them at room temperature for a few days, but if you want to extend their shelf life, pop them in the refrigerator. They’ll last about a week in there, but trust me, they’re usually devoured long before that!
If you find yourself with leftovers (or if you just want to be prepared for future cookie cravings), you can also freeze these delightful treats. Just lay them out in a single layer on a baking sheet to freeze them solid first. Once frozen, transfer them to a freezer-safe airtight container or a resealable bag, layering parchment paper between the cookies to prevent sticking. They can be stored in the freezer for up to three months.
When you’re ready to enjoy a cookie from the freezer, simply take out as many as you’d like and let them thaw in the fridge for a few hours, or at room temperature for about 30 minutes. If you prefer a warm cookie, you can also pop them in the microwave for about 10-15 seconds. Just be careful not to overdo it, or you might end up with a melted chocolate puddle!
With these storage and reheating tips, you can savor the delightful taste of your *Homemade Tagalong Cookies* anytime your sweet tooth strikes! Enjoy every delicious bite!
Serving Suggestions
Now that you’ve made your amazing *Homemade Tagalong Cookies*, let’s talk about how to elevate your cookie experience! These treats are delicious on their own, but pairing them with the right accompaniments can take your enjoyment to a whole new level. Here are some delightful serving suggestions:
Milk: You can’t go wrong with a classic! A tall glass of cold milk is the perfect partner for these cookies. The creamy peanut butter and rich chocolate flavors balance beautifully with the refreshing taste of milk.
Coffee: If you’re a coffee lover, try pairing your cookies with a warm cup of your favorite brew. The bittersweet notes of the coffee complement the sweetness of the cookies, creating a wonderful harmony of flavors.
Ice Cream: For a decadent dessert experience, serve your *Homemade Tagalong Cookies* alongside a scoop of vanilla or chocolate ice cream. You can even crumble the cookies over the ice cream for an extra special treat!
Fruit: Fresh fruit, like strawberries or bananas, adds a refreshing touch. The natural sweetness and acidity from the fruit contrast nicely with the rich flavors of the cookies, making for a nice balance.
Chocolate Sauce: Drizzle some warm chocolate sauce on top of the cookies for an extra indulgent treat. It’s like adding a little extra love to an already delightful dessert!
Whatever you choose, these serving suggestions will enhance your *Homemade Tagalong Cookies* and make every bite an unforgettable experience. Enjoy sharing (or hoarding!) these cookies with your loved ones, and savor each delicious moment!