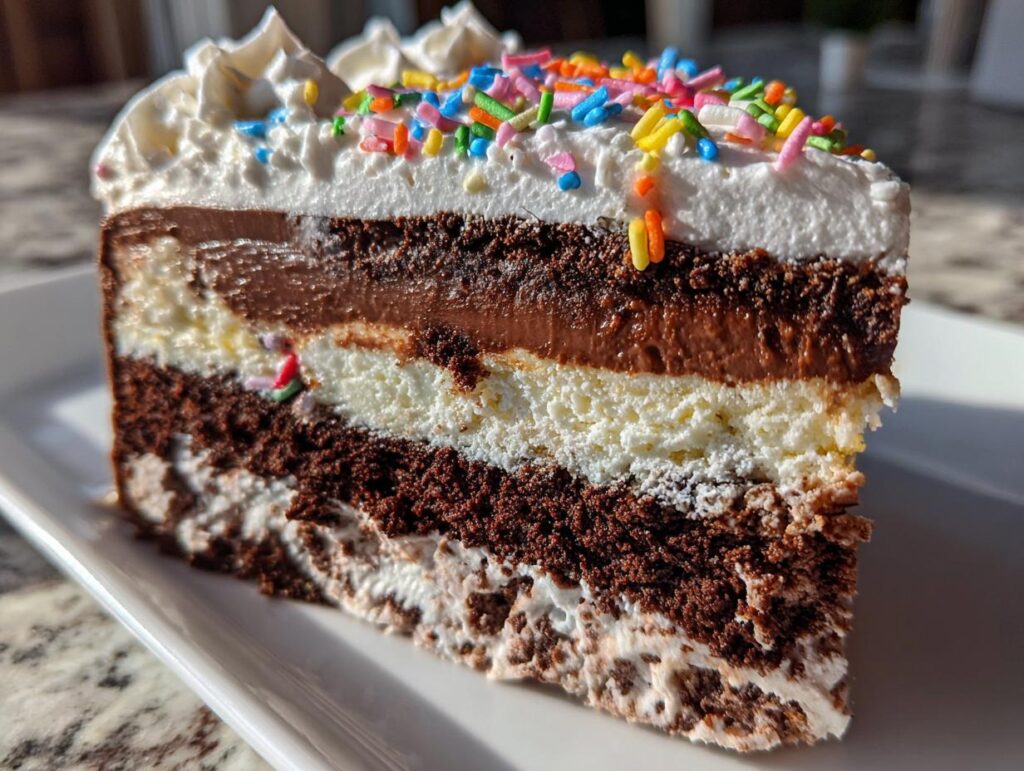
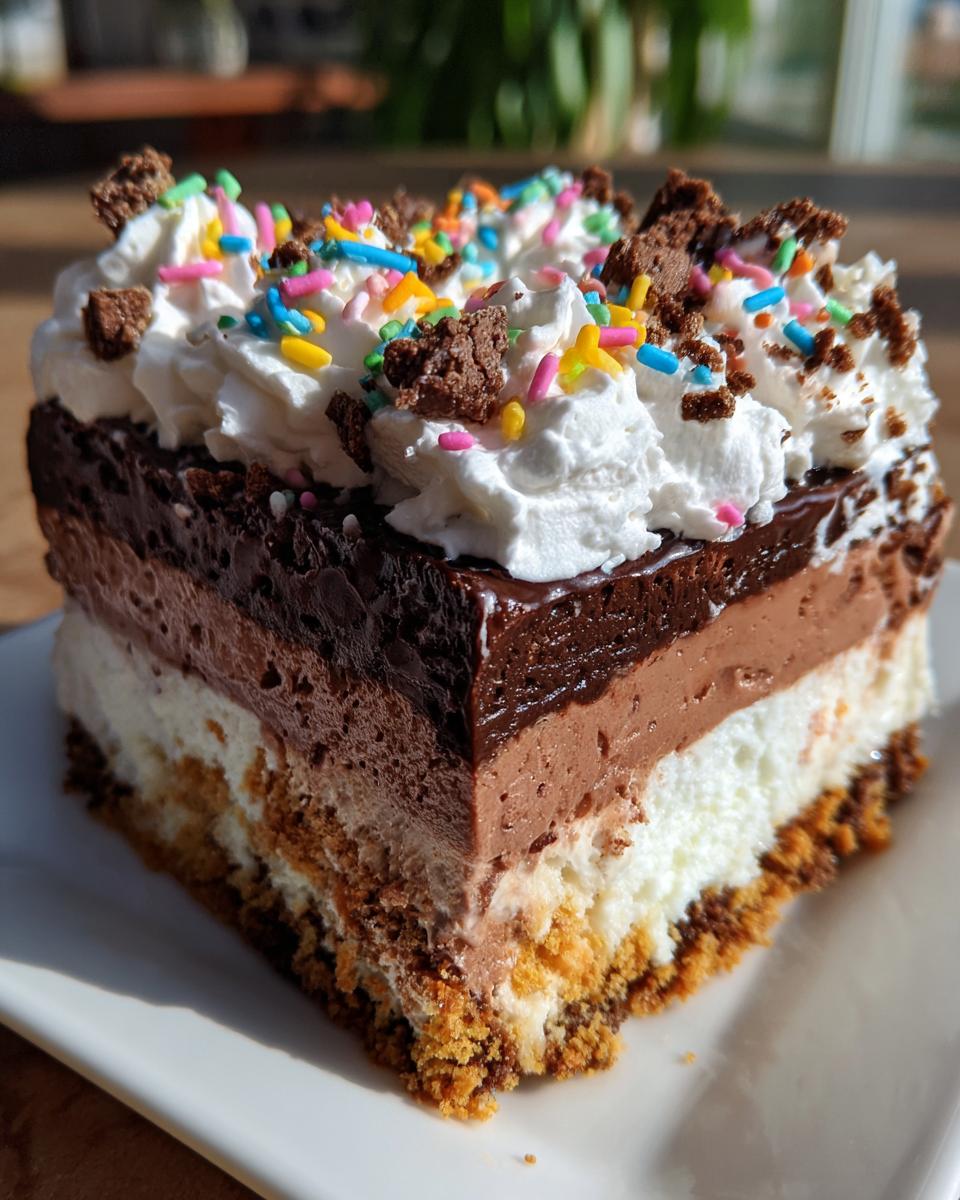
Oh, the joy of recreating a classic dessert at home! There’s something incredibly satisfying about taking those beloved flavors from childhood and turning them into something you can share with friends and family. This Copycat Dairy Queen Ice Cream Cake is a total game changer, trust me! Every bite brings back sweet memories of hot summer days and celebratory moments. Picture layers of rich chocolate and creamy vanilla ice cream, all sitting on a crunchy cookie base, topped with a luscious fudge layer and fluffy whipped cream. It’s like a party on a plate! Whether you’re celebrating a birthday, an anniversary, or just craving something delicious, this cake ticks all the boxes. And the best part? You can make it right in your own kitchen! So grab your favorite ice cream, and let’s dive into this delightful journey of flavor and nostalgia together!
Ingredients List
Gathering the right ingredients is the first step toward making your very own Copycat Dairy Queen Ice Cream Cake, and I promise it’s totally worth it! Here’s what you’ll need:
- Chocolate Cookie Crunchies:
- 3/4 cup (100g) Oreo crumbs (about 9 Oreos)
- 1 1/2 tbsp butter, melted
- Ice Cream Layers:
- 1.5 quart container vanilla ice cream
- 1.5 quart container chocolate ice cream
- Chocolate Fudge:
- 6 oz (1 cup) semi-sweet chocolate chips
- 3 tbsp light corn syrup
- 1/2 tsp vanilla extract
- 1/2 cup (120ml) heavy whipping cream
- Whipped Cream:
- 2 cups (480ml) heavy whipping cream, cold
- 1 cup (115g) powdered sugar
- 1 1/2 tsp vanilla extract
- Sprinkles: for decoration
Make sure to have everything ready before you start, so you can enjoy the process without any hiccups. Happy baking!
How to Prepare Instructions
Alright, let’s get down to the fun part—making this Copycat Dairy Queen Ice Cream Cake! Follow these steps, and you’ll be on your way to dessert heaven:
- First things first, preheat your oven to 350°F (176°C) and line a cookie sheet with parchment paper. This will make cleanup a breeze later!
- In a bowl, combine the Oreo crumbs and melted butter. Give it a good stir until everything’s mixed well. Then, spread this mixture evenly on your prepared cookie sheet. It’s going to form that delicious crunchy base.
- Bake the cookie crust for 8–10 minutes until it’s nice and set. Once it’s done, let it cool for a bit, then break it up into smaller chunks if there are any large clumps. Set this aside for later.
- Now, line an 8×3 inch cake pan with clear wrap, making sure to cover the bottom and the sides. This is key for easy removal later on!
- Take your chocolate ice cream out of the freezer and let it soften for about 20 minutes. Once it’s soft enough, stir it until smooth and then spread it evenly in the bottom of the prepared pan. Pop it in the freezer for about 30 minutes to firm up.
- While that’s freezing, let’s make the fudge layer! Combine the chocolate chips, corn syrup, and vanilla in a bowl. In a saucepan, heat the heavy cream until it’s just boiling. Pour the hot cream over the chocolate mixture, let it sit for 2–3 minutes, then whisk until smooth. Oh, the smell is heavenly!
- Pour the fudge over the chocolate ice cream layer and spread it out evenly. Return this to the freezer for another 10 minutes. We want that fudge to set just a bit.
- Now, sprinkle those delicious cookie crumbles on top of the fudge layer and freeze for at least 2 hours, or until it’s mostly firm.
- When you’re ready for the vanilla layer, take the vanilla ice cream out and let it soften for 20 minutes. Stir it until smooth, then spread it over the top of the cake. Freeze this for 2–3 hours, or until firm.
- Once your cake is completely frozen, lift it out using the clear wrap, and place it on a serving plate. Return it to the freezer to keep it nice and chilled until you’re ready to frost!
- Now, let’s make that fluffy whipped cream! In a mixing bowl, whip the cold heavy cream, powdered sugar, and vanilla extract until stiff peaks form. It should look light and airy—just perfect for frosting!
- Frost the cake generously with the whipped cream, and feel free to decorate it with sprinkles or pipe it however you like. The more festive, the better!
- Finally, store your masterpiece in the freezer until it’s time to serve. Oh, the anticipation!
And there you have it! Follow these steps, and you’ll have a stunning Copycat Dairy Queen Ice Cream Cake that’s sure to impress everyone. Enjoy every delicious bite!
Why You’ll Love This Recipe
This Copycat Dairy Queen Ice Cream Cake is a true delight, and here’s why you’ll absolutely love making it:
- Quick Preparation: Most of the work is in layering—easy peasy!
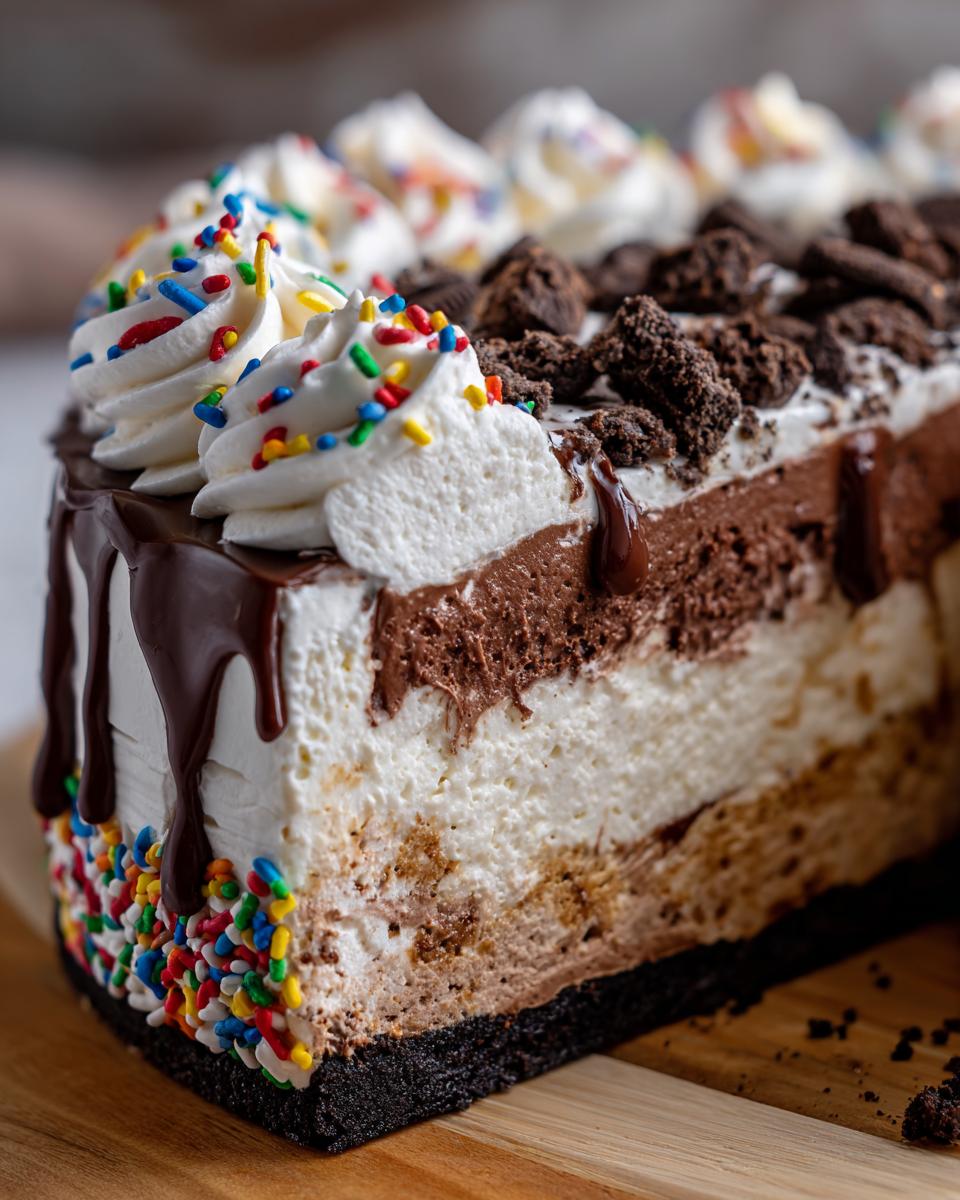
- Layers of Flavor: The combination of chocolate and vanilla ice cream, fudge, and cookie crunch creates a symphony of deliciousness.
- Nostalgic Taste: Every bite takes you back to those blissful summer days and birthday celebrations.
- Satisfaction of Homemade: There’s nothing quite like serving a cake made from scratch, especially when it looks and tastes this good!
Trust me, this dessert is sure to become a favorite in your home!
Tips for Success
Let’s talk about a few tips to ensure your Copycat Dairy Queen Ice Cream Cake turns out absolutely perfect. First off, make sure to soften your ice cream about 20 minutes before using it. This step is crucial! If it’s too hard, spreading it can be a real struggle, and nobody wants a lumpy cake!
Next, don’t skimp on the heavy whipping cream for your frosting. It’s what gives that light, airy texture that makes every bite feel like a cloud of sweetness. When whipping, keep your bowl and beaters cold to help achieve those lovely stiff peaks faster.
And remember, patience is key! Let each layer freeze properly before adding the next one. Rushing this part can result in a melty mess—definitely not what we want! With these tips, you’ll have a stunning cake that tastes as good as it looks. Happy baking!
Variations
The beauty of this Copycat Dairy Queen Ice Cream Cake lies in its versatility! You can easily switch things up to suit your cravings or seasonal flavors. Here are a few fun ideas:
- Ice Cream Flavors: Why not try swapping the chocolate and vanilla ice creams for mint chocolate chip or strawberry? The options are endless!
- Alternative Toppings: Instead of sprinkles, you could top it with crushed nuts, mini chocolate chips, or even fresh berries for a fruity twist.
- Fruit Layers: Consider adding a layer of sliced strawberries or bananas between the ice cream layers for a fresh, fruity burst.
Feel free to get creative and make it your own—after all, that’s the joy of baking at home!
Storage & Reheating Instructions
Storing your Copycat Dairy Queen Ice Cream Cake is super easy! Just keep it in the freezer, tightly wrapped in plastic wrap or in an airtight container. This way, it will stay fresh and delicious for up to 4–5 days. After that, the texture might start to change a bit, but trust me, it’ll still taste amazing!
When you’re ready to serve, just take it out of the freezer and let it sit at room temperature for about 10-15 minutes. This will make slicing easier and allow the flavors to shine. Enjoy your delightful creation while it’s still cold and creamy!
Nutritional Information
When it comes to enjoying your Copycat Dairy Queen Ice Cream Cake, it’s good to know what you’re indulging in! Keep in mind that nutrition values can vary based on the specific ingredients and brands you use, so this is just a general guide. Each slice of this delightful cake typically contains around 661 calories, with about 50 grams of sugar and 46.3 grams of fat. You’ll also get 8.4 grams of protein and 55 grams of carbohydrates. Remember, every bite is worth it, especially when you’re celebrating something special!
FAQ Section
Got questions about this Copycat Dairy Queen Ice Cream Cake? I’ve got you covered! Here are some common queries that might help you out:
- Can I use different ice cream flavors? Absolutely! Feel free to swap out the chocolate and vanilla with your favorites, like cookie dough or mint chocolate chip. The world is your ice cream oyster!
- How do I prevent my cake from melting? Make sure each layer is fully frozen before adding the next. This keeps everything nice and firm and prevents a melty disaster!
- What if I don’t have heavy whipping cream for frosting? You could use whipped topping as a substitute, but it won’t have that rich, creamy texture that homemade whipped cream offers. Trust me, it’s worth it to use the real deal!
- Can I make this cake in advance? Yes, you can prepare it a few days ahead! Just store it tightly wrapped in the freezer until you’re ready to serve. It’s perfect for stress-free entertaining!
- How do I serve it for the best texture? Let the cake sit at room temperature for about 10-15 minutes before slicing. This makes it easier to cut and helps those flavors shine!
For more recipes follow me in page Facebook and Pinterest.
Print
Copycat Dairy Queen Ice Cream Cake: 12 Reasons to Indulge
- Total Time: 3 hours 20 minutes
- Yield: 12 slices 1x
- Diet: Vegetarian
Description
This is a copycat recipe for Dairy Queen Ice Cream Cake, featuring layers of chocolate and vanilla ice cream, a fudge layer, and a crunchy cookie base.
Ingredients
- Chocolate Cookie Crunchies:
- 3/4 cup (100g) Oreo crumbs (about 9 Oreos)
- 1 1/2 tbsp butter, melted
- Ice Cream Layers:
- 1.5 quart container vanilla ice cream
- 1.5 quart container chocolate ice cream
- Chocolate Fudge:
- 6 oz (1 cup) semi-sweet chocolate chips
- 3 tbsp light corn syrup
- 1/2 tsp vanilla extract
- 1/2 cup (120ml) heavy whipping cream
- Whipped Cream:
- 2 cups (480ml) heavy whipping cream, cold
- 1 cup (115g) powdered sugar
- 1 1/2 tsp vanilla extract
- Sprinkles, for decoration
Instructions
- Preheat oven to 350°F (176°C) and line a cookie sheet with parchment paper.
- Combine Oreo crumbs and melted butter, stir well, spread on prepared sheet.
- Bake 8–10 minutes, cool, and break up large clumps. Set aside.
- Line an 8×3 inch cake pan with clear wrap, covering bottom and sides.
- Soften chocolate ice cream 20 minutes before using, stir until smooth, and spread evenly in pan. Freeze 30 minutes.
- For fudge: combine chocolate chips, corn syrup, and vanilla in a bowl. Heat heavy cream until just boiling, pour over chocolate, sit 2–3 minutes, then whisk smooth.
- Pour fudge over chocolate ice cream layer and spread evenly. Freeze 10 minutes.
- Sprinkle cookie crumbles on top of fudge and freeze 2 hours until mostly firm.
- Soften vanilla ice cream 20 minutes before using, stir smooth, spread over top of cake, and freeze 2–3 hours until firm.
- Lift frozen cake using the clear wrap, place on a serving plate, and return to freezer.
- Whip heavy cream, powdered sugar, and vanilla extract until stiff peaks form.
- Frost the cake with whipped cream and decorate with sprinkles or piping as desired.
- Store frozen until serving. Best consumed within 4–5 days.
Notes
- Using an 8×3 inch pan creates a taller cake; a 9-inch pan can be used but cake will be shorter.
- Use semi-sweet chocolate for the fudge layer to ensure it sets properly.
- Prep Time: 1 hour
- Cook Time: 20 minutes
- Category: Dessert
- Method: Baking and Freezing
- Cuisine: American
Nutrition
- Serving Size: 1 slice
- Calories: 661
- Sugar: 50 g
- Sodium: 118.6 mg
- Fat: 46.3 g
- Saturated Fat: 24 g
- Unsaturated Fat: 22.3 g
- Trans Fat: 0 g
- Carbohydrates: 55 g
- Fiber: 1 g
- Protein: 8.4 g
- Cholesterol: 173.7 mg
Keywords: copycat, Dairy Queen, ice cream cake