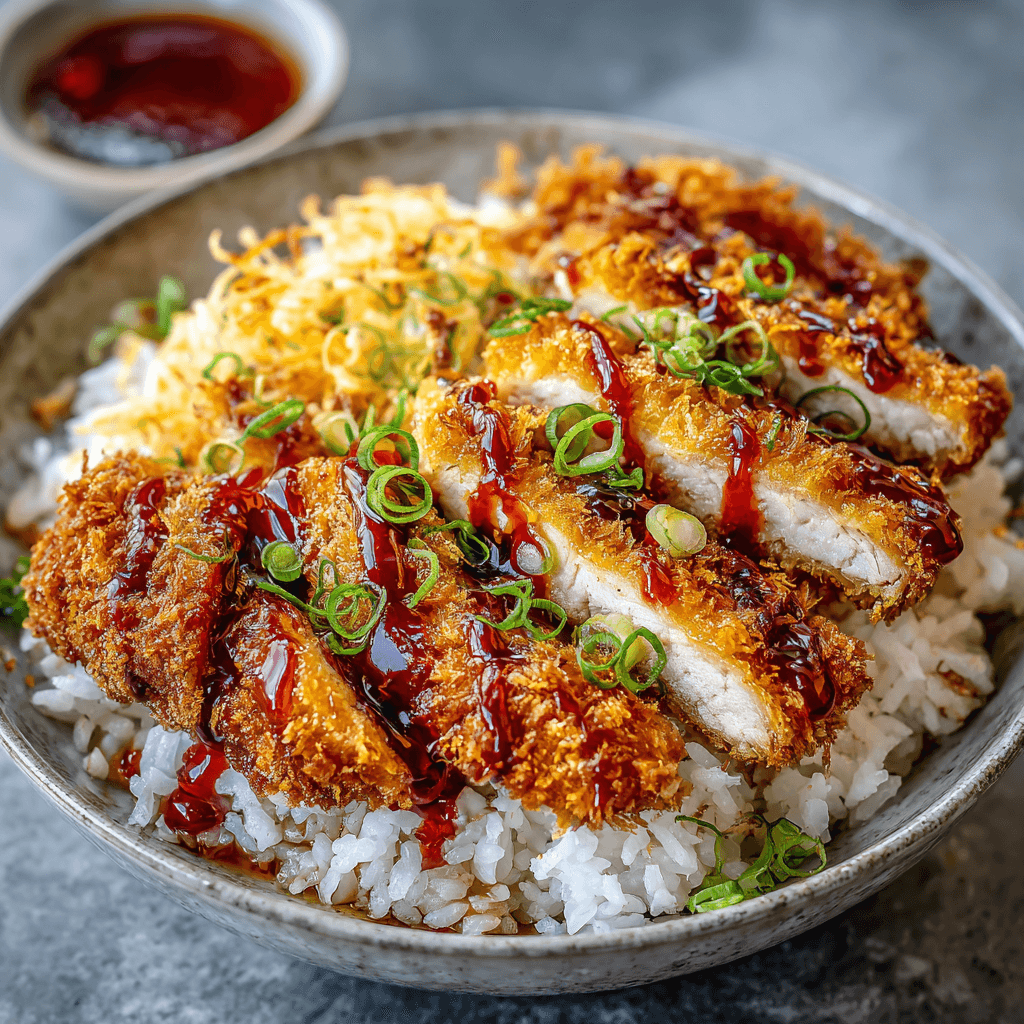
As a busy mom, I know how challenging it can be to whip up a meal that everyone will love. That’s where my Crispy Japanese Katsu Bowls come in! This dish is not only a feast for the eyes but also a quick solution for those hectic weeknights. Imagine tender, breaded pork chops, perfectly fried to golden perfection, served over a bed of fluffy rice. It’s a comforting meal that brings smiles to the table and is sure to impress your loved ones. Trust me, once you try this recipe, it will become a staple in your kitchen!
Crispy Japanese Katsu Bowls You Can’t Resist Trying
- Total Time: 30 minutes
- Yield: 2 servings 1x
- Diet: Gluten Free
Description
Crispy Japanese Katsu Bowls are a delicious and satisfying dish featuring breaded and fried meat served over rice with a flavorful sauce.
Ingredients
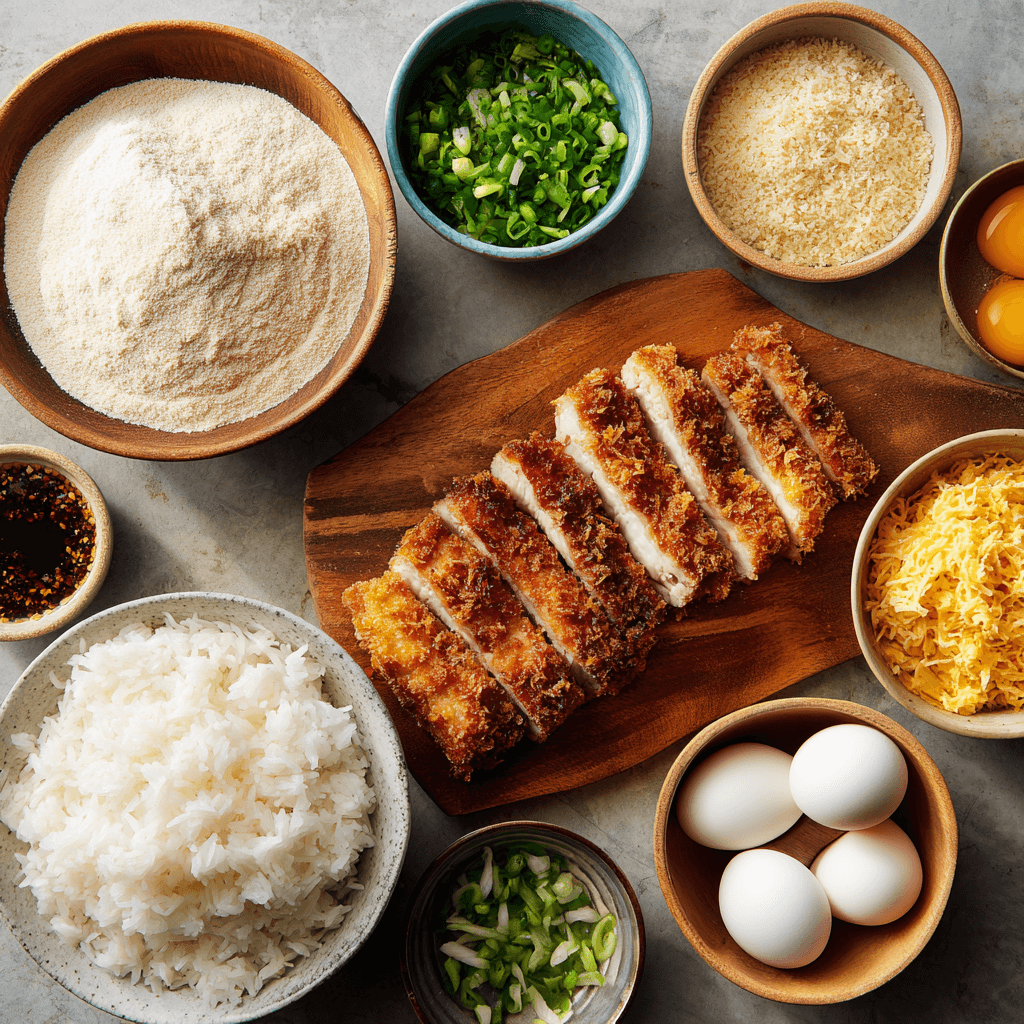
- 2 boneless pork chops
- 1 cup panko breadcrumbs
- 1/2 cup all-purpose flour
- 1 large egg
- Salt and pepper to taste
- Vegetable oil for frying
- 2 cups cooked rice
- 1/4 cup tonkatsu sauce
- Chopped green onions for garnish
Instructions
- Season the pork chops with salt and pepper.
- Dredge each chop in flour, then dip in beaten egg, and finally coat with panko breadcrumbs.
- Heat vegetable oil in a pan over medium heat.
- Fry the breaded pork chops until golden brown and cooked through, about 4-5 minutes per side.
- Remove from the pan and let them rest for a few minutes before slicing.
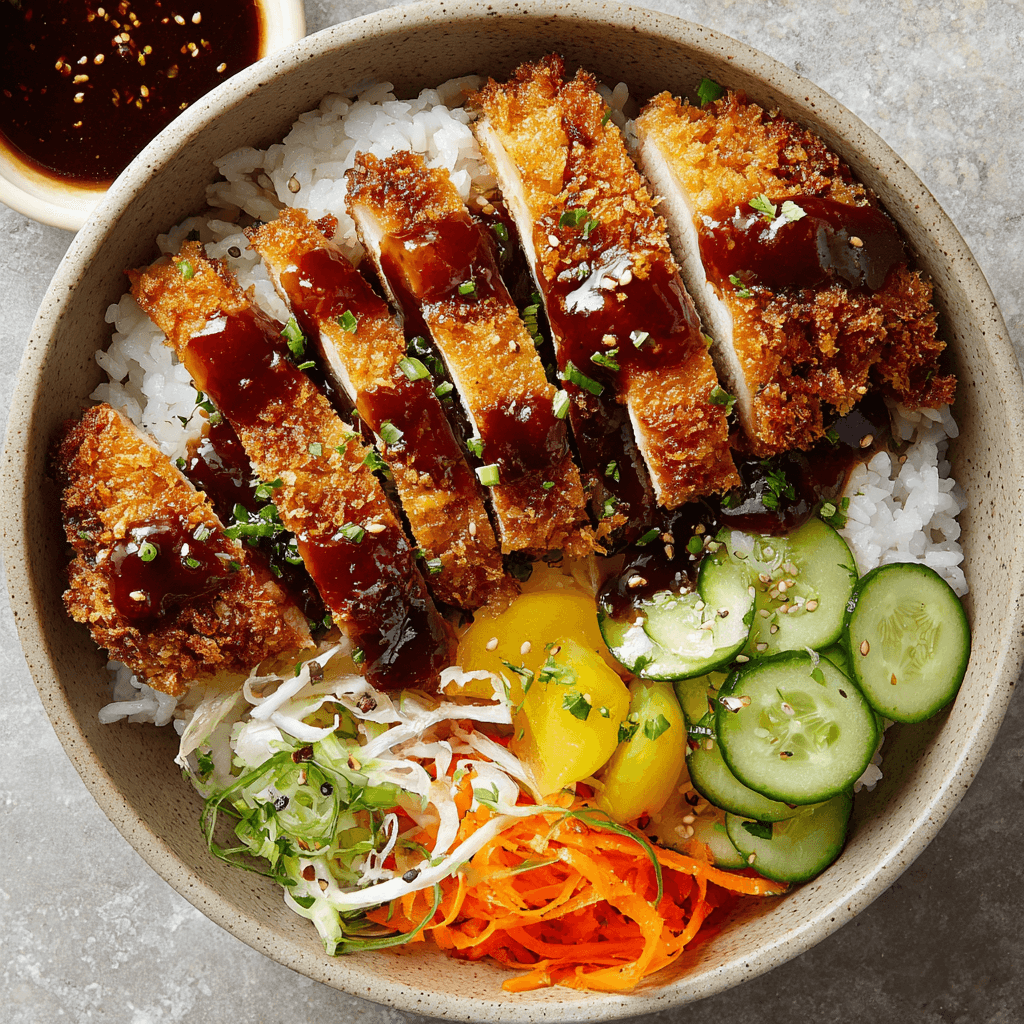
- Serve the sliced katsu over cooked rice and drizzle with tonkatsu sauce.
- Garnish with chopped green onions.
Notes
- For a healthier option, you can bake the katsu instead of frying.
- Feel free to substitute chicken or tofu for the pork.
- Serve with a side of pickled vegetables for added flavor.
- Prep Time: 15 minutes
- Cook Time: 15 minutes
- Category: Main Course
- Method: Frying
- Cuisine: Japanese
Nutrition
- Serving Size: 1 bowl
- Calories: 600
- Sugar: 5g
- Sodium: 800mg
- Fat: 30g
- Saturated Fat: 5g
- Unsaturated Fat: 20g
- Trans Fat: 0g
- Carbohydrates: 60g
- Fiber: 2g
- Protein: 25g
- Cholesterol: 70mg
Keywords: Crispy Japanese Katsu Bowls, Katsu, Japanese cuisine, fried pork, tonkatsu
Table of Contents
Why You’ll Love This Crispy Japanese Katsu Bowls
These Crispy Japanese Katsu Bowls are a game-changer for busy nights. They come together in just 30 minutes, making them perfect for those evenings when time is tight. The combination of crunchy katsu and savory tonkatsu sauce creates a flavor explosion that will have your family asking for seconds. Plus, you can easily customize the ingredients to suit your family’s tastes, ensuring everyone leaves the table happy!
Ingredients for Crispy Japanese Katsu Bowls
Gathering the right ingredients is key to making these delightful Crispy Japanese Katsu Bowls. Here’s what you’ll need:
- Boneless pork chops: The star of the dish! They’re juicy and tender, perfect for frying.
- Panko breadcrumbs: These Japanese-style breadcrumbs give the katsu its signature crunch. They’re lighter and crispier than regular breadcrumbs.
- All-purpose flour: This helps the egg adhere to the pork, creating a solid base for the panko coating.
- Large egg: Beaten, it acts as a binding agent, ensuring the breadcrumbs stick well to the meat.
- Salt and pepper: Simple seasonings that enhance the flavor of the pork. Don’t skip this step!
- Vegetable oil: Essential for frying. It should have a high smoke point, making it perfect for achieving that golden brown crust.
- Cooked rice: A fluffy bed for your katsu. You can use white, brown, or even sushi rice for a twist.
- Tonkatsu sauce: This sweet and tangy sauce is the finishing touch that elevates the dish. It’s a must-have!
- Chopped green onions: For garnish, they add a pop of color and a fresh flavor that complements the richness of the katsu.
For those looking to mix things up, you can substitute chicken or tofu for the pork. If you’re aiming for a healthier option, consider baking the katsu instead of frying. You can find all the exact measurements at the bottom of the article, ready for printing!
How to Make Crispy Japanese Katsu Bowls
Now that you have all your ingredients ready, let’s dive into the fun part—making these Crispy Japanese Katsu Bowls! Follow these simple steps, and you’ll have a delicious meal in no time.
Step 1: Season the Pork Chops
Start by seasoning your boneless pork chops with salt and pepper. This simple step enhances the flavor of the meat. Don’t be shy—make sure to coat both sides evenly. A little seasoning goes a long way in making your katsu truly delicious!
Step 2: Prepare the Breading Station
Next, it’s time to set up your breading station. Grab three shallow dishes. In the first, add all-purpose flour. In the second, beat the large egg until it’s nice and frothy. Finally, fill the third dish with panko breadcrumbs. Dredge each pork chop in flour first, shaking off any excess. Then, dip it into the egg, letting the extra drip off. Finally, coat it with panko breadcrumbs, pressing gently to ensure a good layer sticks. This three-step process is key to achieving that crispy texture!
Step 3: Heat the Oil
Now, let’s heat the vegetable oil in a large pan over medium heat. You want enough oil to cover the bottom of the pan, about half an inch deep. To check if the oil is hot enough, drop a small piece of bread into it. If it sizzles and bubbles, you’re ready to fry! This step is crucial for getting that perfect golden brown crust.
Step 4: Fry the Katsu
Carefully place the breaded pork chops into the hot oil. Fry them for about 4-5 minutes on each side. You’re looking for a beautiful golden brown color. If the oil starts to smoke, lower the heat a bit. Once cooked through, remove the katsu from the pan and place them on a paper towel-lined plate to absorb any excess oil. This will keep your katsu crispy!
Step 5: Rest and Slice
After frying, let the katsu rest for a few minutes. This step is important! Resting allows the juices to redistribute, ensuring each bite is tender and juicy. Once rested, slice the katsu into strips. The crispy exterior and juicy interior will make your mouth water!
Step 6: Assemble the Bowl
Finally, it’s time to assemble your Crispy Japanese Katsu Bowls! Start with a generous scoop of cooked rice as your base. Lay the sliced katsu on top, and don’t forget to drizzle it with tonkatsu sauce. For a pop of color and flavor, sprinkle some chopped green onions on top. Your bowl is now ready to be devoured!
Tips for Success
- Make sure your oil is hot enough before frying to achieve that crispy texture.
- Don’t overcrowd the pan; fry in batches if necessary for even cooking.
- Let the katsu rest after frying to keep it juicy and tender.
- Experiment with different proteins like chicken or tofu for variety.
- Serve with pickled vegetables for an authentic touch and extra flavor!
Equipment Needed
- Large frying pan: A non-stick skillet works well, but any heavy-bottomed pan will do.
- Shallow dishes: Use pie plates or any flat bowls for the breading station.
- Meat thermometer: Optional, but helpful for ensuring the pork is cooked through.
- Paper towels: For draining excess oil after frying.
Variations
- Chicken Katsu: Swap out the pork for boneless chicken breasts for a lighter option that’s just as delicious.
- Tofu Katsu: For a vegetarian twist, use firm tofu. Press it to remove excess moisture, then bread and fry as usual.
- Spicy Katsu: Add a dash of cayenne pepper or chili flakes to the flour for a spicy kick that will tantalize your taste buds.
- Gluten-Free Katsu: Substitute regular flour and panko with gluten-free alternatives to make this dish suitable for gluten-sensitive diners.
- Veggie Katsu: Use thinly sliced eggplant or zucchini instead of meat for a delightful vegetable version that’s packed with flavor.
Serving Suggestions
- Pair your Crispy Japanese Katsu Bowls with a side of steamed broccoli or sautéed bok choy for a nutritious boost.
- Serve with a refreshing cucumber salad dressed in rice vinegar for a light contrast.
- For drinks, consider green tea or a light Japanese beer to complement the flavors.
- Garnish with sesame seeds for an elegant touch!
For more recipes follow me in page Facebook and Pinterest
FAQs about Crispy Japanese Katsu Bowls
Can I make Crispy Japanese Katsu Bowls ahead of time?
Absolutely! You can prepare the katsu in advance and store it in the fridge. Just reheat it in the oven to maintain that crispy texture. This makes it a great option for meal prep!
What can I substitute for tonkatsu sauce?
If you don’t have tonkatsu sauce, you can use a mix of ketchup and Worcestershire sauce as a quick alternative. It won’t be the same, but it will still add a nice flavor to your katsu!
Is this recipe suitable for kids?
Yes! Kids usually love the crispy texture and the savory taste of katsu. You can even let them help with the breading process for a fun family activity!
Can I bake the katsu instead of frying it?
Definitely! For a healthier option, you can bake the breaded pork chops at 400°F (200°C) for about 20 minutes, flipping halfway through. Just keep an eye on them to ensure they get crispy!
What sides pair well with Crispy Japanese Katsu Bowls?
Some great sides include steamed vegetables, miso soup, or a simple salad. These will complement the rich flavors of the katsu and create a balanced meal!
Final Thoughts
Making Crispy Japanese Katsu Bowls is more than just cooking; it’s about creating a moment of joy for you and your family. The delightful crunch of the katsu paired with the fluffy rice and tangy sauce brings a comforting warmth to the table. I love how this dish transforms a busy weeknight into a special occasion, where everyone gathers to savor each bite. Plus, the smiles on my loved ones’ faces make all the effort worthwhile. So, roll up your sleeves and dive into this culinary adventure—you won’t regret it!