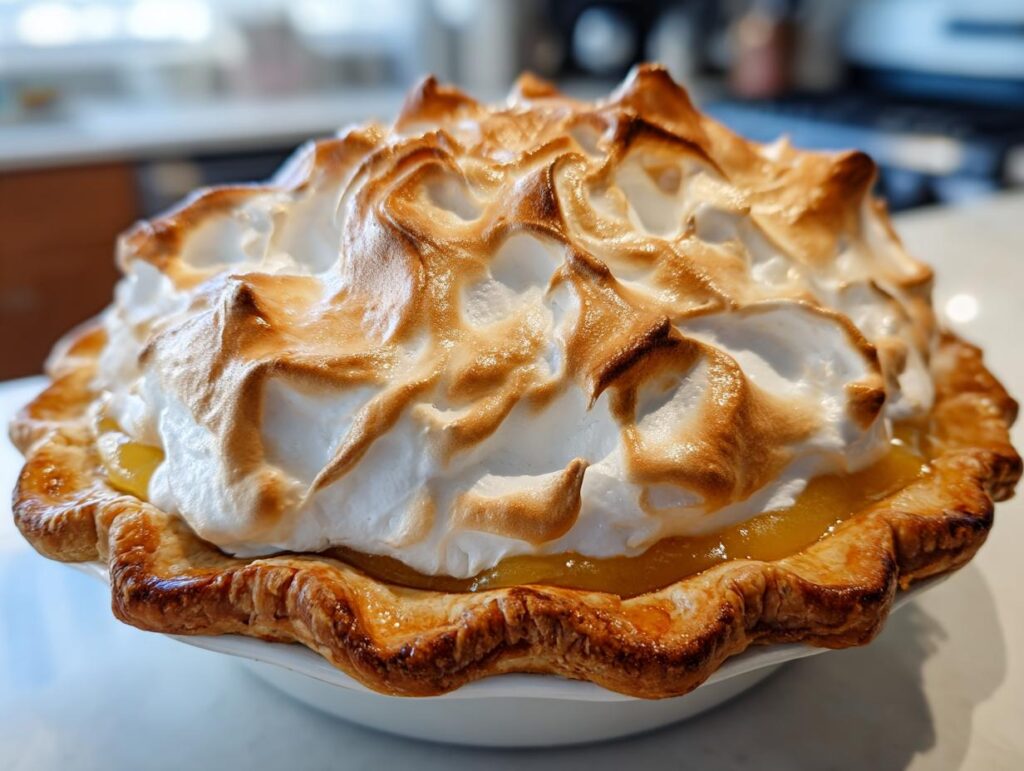
Ah, Homemade Butterscotch Cream Pie! Just saying it makes my heart flutter. This pie has been a family favorite for as long as I can remember. I recall sunny afternoons in my grandmother’s kitchen, the air filled with the sweet aroma of melting butter and brown sugar. We’d gather around the table, eagerly waiting for that cool, creamy slice topped with fluffy meringue. It was a staple at every holiday and special occasion, and honestly, it still is! What sets this pie apart is the perfect balance of rich butterscotch flavor and the lightness of the meringue. Trust me, once you take a bite, you’ll understand why it’s become a cherished tradition. It’s not just a dessert; it’s a slice of nostalgia that brings everyone together, and I can’t wait to share my version with you!

Ingredients for Homemade Butterscotch Cream Pie
- 1 – 9 inch pre baked pie shell, shallow
- 1 cup packed brown sugar (half light and half dark)
- 1/4 cup cornstarch
- 1/2 teaspoon salt
- 2 cups milk (2% or whole)
- 2/3 cup half & half
- 5 1/3 tablespoons unsalted butter
- 3 egg yolks, slightly beaten
- 2 teaspoons pure vanilla extract
- 4 large egg whites (room temperature)
- 1 cup sugar
- 1/8 teaspoon cream of tartar
- 1/2 teaspoon pure vanilla extract
How to Prepare Homemade Butterscotch Cream Pie
Now that we’ve gathered our ingredients, let’s dive into the magic of making this delicious homemade butterscotch cream pie! Follow these steps, and soon enough, you’ll have a dessert that’s just as delightful as the memories it holds.
Preparing the Butterscotch Filling
First things first, we need to whip up that luscious butterscotch filling! Start by adding the slightly beaten egg yolks to a bowl. Keep a whisk handy because you’ll need it! In a medium saucepan, combine the brown sugar, cornstarch, salt, milk, and half & half. Heat this mixture over medium heat, stirring constantly until it reaches a gentle boil. Don’t worry; it’ll take about 5-7 minutes, but keep that whisk moving to avoid any lumps forming.
Once it starts to boil, let it bubble for just 1 minute. Remove it from the heat and take half of this hot mixture and pour it into the bowl with the egg yolks, whisking quickly to combine. This step is essential to temper the eggs, preventing them from scrambling. Pour this egg mixture back into the saucepan and return it to the heat. Cook for another minute, stirring constantly until it thickens up beautifully. You’ll know it’s ready when it coats the back of a spoon!
Now, add the unsalted butter and vanilla extract, mixing until the filling is silky smooth. Pour this heavenly butterscotch mixture into your pre-baked pie shell and set it aside to cool while we tackle the meringue.
Making the Meringue Topping
Ah, the meringue! This is where the magic happens. Start by filling a saucepan with water and bringing it to a gentle simmer. In a heatproof bowl, combine the egg whites, sugar, and cream of tartar. Place this bowl over the simmering water. The goal here is to warm the egg whites and dissolve the sugar. Stir gently until the mixture feels warm to the touch and the sugar is completely dissolved.
Once that’s done, transfer the bowl to your mixer. Start beating on low speed, gradually increasing to high for about 10 minutes. This is where the fun begins! You’re looking for stiff peaks, which means when you lift the whisk, the peaks should stand tall without drooping. If you notice any liquid pooling at the bottom, keep beating until you achieve that perfect consistency. Add the remaining vanilla extract right at the end and mix just until combined.
Assembling the Pie
Now for the grand finale! Preheat your oven to 350°F (175°C) if you haven’t done so already. Carefully pour the cooled butterscotch filling into the pre-baked pie shell. Then, take that glorious meringue and pile it on top, spreading it to the edges to seal in the filling. This helps prevent it from shrinking as it bakes.
Pop the pie in the oven for about 5 minutes, just to warm the filling through. Then, increase the oven temperature to 375°F (190°C) and bake for another 8 minutes or until the meringue is golden and beautifully browned. Keep a close eye on it, as it can brown quickly! Once it’s done, remove it from the oven and let it cool to room temperature. After that, refrigerate for at least 2 hours before serving, or enjoy it at room temperature. Trust me, the wait is worth it!
Why You’ll Love This Homemade Butterscotch Cream Pie
- Delicious Flavor: The rich, buttery butterscotch filling paired with the fluffy meringue creates a taste sensation that’s simply irresistible. Each bite is a perfect blend of sweetness and creaminess!
- Simple Ingredients: You’ll find that most of the ingredients are pantry staples. With just a few basic items, you can create a pie that tastes like it came from a fancy bakery.
- Crowd-Pleaser: Whether it’s a family gathering, a holiday dinner, or just a weekend treat, this pie always gets rave reviews. People love it, and it’s a guaranteed way to impress your guests!
- Perfect for Any Occasion: From birthdays to holidays, this pie is versatile enough to shine on any dessert table. It’s become a staple in my home, and I bet it’ll be in yours, too!
- Fun to Make: The process of creating this pie is as enjoyable as eating it! You’ll love whipping up the filling and mastering the meringue, all while filling your kitchen with delightful aromas.
Tips for Success
To ensure your Homemade Butterscotch Cream Pie turns out perfectly every time, I’ve got some tried-and-true tips that will help you master this delightful dessert. Trust me, these little nuggets of wisdom can make a big difference!
Perfecting the Meringue
Getting that meringue just right can feel tricky, but don’t fear! First off, make sure your mixing bowl and beaters are completely clean and dry. Any grease can prevent the egg whites from whipping up properly. I always give mine a quick wipe with a little vinegar or lemon juice just to be safe. Also, remember to use room temperature egg whites; they whip up better than cold ones. When you start whisking, gradually increase the speed to avoid splatters, and keep an eye out for those stiff peaks – they should stand tall and proud!
Avoiding Common Pitfalls
When making the butterscotch filling, be patient during the cooking process. Stir constantly until it thickens, but don’t rush it. If it feels too thick, you can whisk in a little bit of milk to loosen it up before pouring it into the pie shell. And don’t forget to temper the egg yolks properly! This step is super important to prevent scrambling. Always pour the hot mixture slowly into the yolks while whisking continuously.
Baking Times and Cooling
Keep a close eye on your pie while it’s in the oven. It can go from beautifully browned to overdone in a flash! Bake the meringue until it’s just golden, usually around 8 minutes, but every oven is different, so check on it regularly. After baking, let the pie cool to room temperature before refrigerating. This helps set the filling and meringue perfectly. Patience is key here! The flavors develop beautifully when it chills for at least two hours before serving, but if you can hold off longer, even better!
With these tips, you’ll be on your way to creating a Homemade Butterscotch Cream Pie that will have everyone raving. Happy baking!

Variations on Homemade Butterscotch Cream Pie
If you’re feeling adventurous or just want to mix things up a bit, I’ve got some delightful variations for your Homemade Butterscotch Cream Pie! Each twist offers a fun new take on the classic while keeping that beloved butterscotch flavor front and center.
Chocolate Butterscotch Cream Pie
For all the chocolate lovers out there, why not add a layer of rich chocolate ganache? Simply melt some chocolate and mix it with a bit of cream. Pour it into the pre-baked pie shell before adding the butterscotch filling. The combination of chocolate and butterscotch is pure heaven!
Nutty Butterscotch Pie
Add some crunch to your pie by incorporating nuts! Chopped pecans or walnuts can be mixed into the butterscotch filling or sprinkled on top of the meringue before baking. They add a lovely texture and an extra layer of flavor that’s just divine.
Spiced Butterscotch Cream Pie
Want to warm things up a bit? Consider adding a dash of cinnamon or nutmeg to your butterscotch filling. It gives the pie a cozy, spiced flavor that’s perfect for fall or winter gatherings. Just a pinch goes a long way, so start small and taste as you go!
Coconut Butterscotch Cream Pie
If you love coconut, this one’s for you! Fold in some sweetened shredded coconut into the butterscotch filling for a tropical twist. You can also top the meringue with toasted coconut flakes before baking for an extra crunchy topping that’s oh-so-delicious.
Fruit-Infused Butterscotch Cream Pie
For a refreshing change, layer some sliced bananas or strawberries in the bottom of the pie shell before adding the butterscotch filling. This not only adds a pop of color but also a burst of freshness that complements the sweetness of the butterscotch beautifully!
These variations can elevate your Homemade Butterscotch Cream Pie to new heights! Feel free to get creative and make it your own. Each version is a chance to bring your personal touch to this classic dessert, ensuring that it stays a favorite for years to come.
Nutritional Information
Before we dive into the deliciousness of our Homemade Butterscotch Cream Pie, I want to share a little disclaimer: nutritional values can vary based on the specific ingredients and brands you use, so these numbers are just an estimate. But let’s take a look at what you can expect in a typical serving of this scrumptious pie!
- Serving Size: 1 slice
- Calories: 300
- Total Fat: 12g
- Saturated Fat: 7g
- Unsaturated Fat: 3g
- Trans Fat: 0g
- Cholesterol: 100mg
- Sodium: 150mg
- Total Carbohydrates: 45g
- Fiber: 1g
- Sugar: 25g
- Protein: 4g
So, while you indulge in this delightful pie, remember that it’s a treat meant to be enjoyed in moderation. Savor every creamy, sweet bite, and don’t forget to share with loved ones! Happy pie-making!
FAQ About Homemade Butterscotch Cream Pie
Q1: Can I make the butterscotch filling ahead of time?
Absolutely! You can prepare the butterscotch filling a day in advance. Just make sure to cover it with plastic wrap directly on the surface to prevent a skin from forming. When you’re ready to assemble your pie, give it a good stir and pour it into the pre-baked pie shell.
Q2: What can I do if my meringue weeps or separates?
Oh no! Weeping meringue can be a little frustrating, but don’t worry, it happens to the best of us. To avoid this, ensure that your mixing bowl and beaters are squeaky clean and free of any grease. Also, try adding a bit more cream of tartar to help stabilize your meringue. Finally, make sure to bake it long enough to set properly without being too dry.
Q3: Is it necessary to refrigerate the pie after baking?
Yes, refrigerating your Homemade Butterscotch Cream Pie is important. It allows the filling to set perfectly and enhances the flavors. It’s best to chill it for at least 2 hours before serving, but if you can wait longer, the taste will only get better!
Q4: Can I use a store-bought pie crust instead of making my own?
Of course! A store-bought pie crust is a fantastic shortcut that saves time. Just make sure it’s pre-baked as instructed on the package before adding your butterscotch filling. You’ll still achieve that delicious homemade taste without the extra effort!
Q5: How should I store any leftover pie?
To keep your leftover pie fresh, cover it loosely with plastic wrap or aluminum foil and store it in the refrigerator. It should last for about 3-4 days, though I bet it won’t last that long once everyone gets a taste!
For more recipes follow me in page Facebook and Pinterest.
Print
Homemade Butterscotch Cream Pie: 5 Steps to Pure Bliss
- Total Time: 50 minutes
- Yield: 8 servings 1x
- Diet: Vegetarian
Description
Delicious homemade butterscotch cream pie with a fluffy meringue topping.
Ingredients
- 1 – 9 inch pre baked pie shell, shallow
- 1 cup packed brown sugar, half light and half dark
- 1/4 cup cornstarch
- 1/2 teaspoon salt
- 2 cups milk, 2% or whole
- 2/3 cup half & half
- 5 1/3 tablespoons unsalted butter
- 3 egg yolks, slightly beaten
- 2 teaspoons pure vanilla extract
- 4 large egg whites, room temperature
- 1 cup sugar
- 1/8 teaspoon cream of tartar
- 1/2 teaspoon pure vanilla extract
Instructions
- Add the beaten egg yolks to a bowl and have a whisk nearby.
- Combine the sugar, cornstarch, salt, milk, and half & half in a saucepan. Bring to a boil over medium heat, stirring constantly. Boil for 1 minute.
- Remove from heat and pour half of the hot mixture into the egg yolks, whisking to combine. Add this mixture back to the pan and return to heat. Cook for about 1 minute until thickened.
- Add butter and vanilla, mixing until smooth. Pour into the pre baked pie shell and set aside.
- For meringue, fill a saucepan with water and bring to a simmer. In a heatproof bowl, combine egg whites, sugar, and cream of tartar.
- Place the bowl over the simmering water, whisk until warm and sugar has dissolved.
- Transfer to a mixer and beat on low, gradually increasing to high for about 10 minutes until stiff peaks form. Add vanilla and mix.
- Place pie in oven for 5 minutes to heat filling, then pile meringue on top, spreading to edges.
- Bake for about 8 minutes until browned, watching closely.
- Cool to room temperature, then refrigerate. Serve at room temperature or after chilling for 2 hours.
Notes
- For a darker butterscotch pie, replace 1 cup of milk with 1 cup of water.
- Prep Time: 30 minutes
- Cook Time: 20 minutes
- Category: Dessert
- Method: Baking
- Cuisine: American
Nutrition
- Serving Size: 1 slice
- Calories: 300
- Sugar: 25g
- Sodium: 150mg
- Fat: 12g
- Saturated Fat: 7g
- Unsaturated Fat: 3g
- Trans Fat: 0g
- Carbohydrates: 45g
- Fiber: 1g
- Protein: 4g
- Cholesterol: 100mg
Keywords: Homemade Butterscotch Cream Pie, Butterscotch Pie, Cream Pie