Hey there, friend! Let me tell you, starting the day off right is so important, and that’s where my Protein Bagels come into play. I can’t tell you how many mornings I’ve rushed out the door, only to regret skipping breakfast. But these bagels? They’re a game changer! Packed with protein, they’re not just filling; they keep me energized through those hectic mornings. Plus, they’re super versatile. You can enjoy them plain, slathered with cream cheese, or even toasted with avocado and a sprinkle of salt – yum!
What makes them even better is that they’re incredibly easy to whip up. I love making a batch on the weekends for quick breakfasts or snacks during the week. Just pop them in the air fryer or bake them in the oven, and you’re good to go! So, whether you’re in need of a hearty breakfast or a nutritious snack to power you through the day, these Protein Bagels are just what you need. Trust me; once you try them, you’ll be hooked!
Ingredients List
Here’s what you’ll need to make these delightful Protein Bagels. It’s a simple list, but each ingredient plays a crucial role in creating that perfect texture and flavor!
- 1 ⅔ cup (210 g) whole-wheat flour, or you can use self-rising flour for an extra fluffy texture
- ⅔ cup (180 g) Greek yogurt, I recommend either 5% or 2% fat for the best results
- 1 ½ tsp baking powder – this is what gives your bagels that lovely rise
- ½ to 1 tsp Kosher salt, or sea salt (optional, but it enhances the flavor)
- 1 egg, or one egg white (optional, for that shiny finish on top)
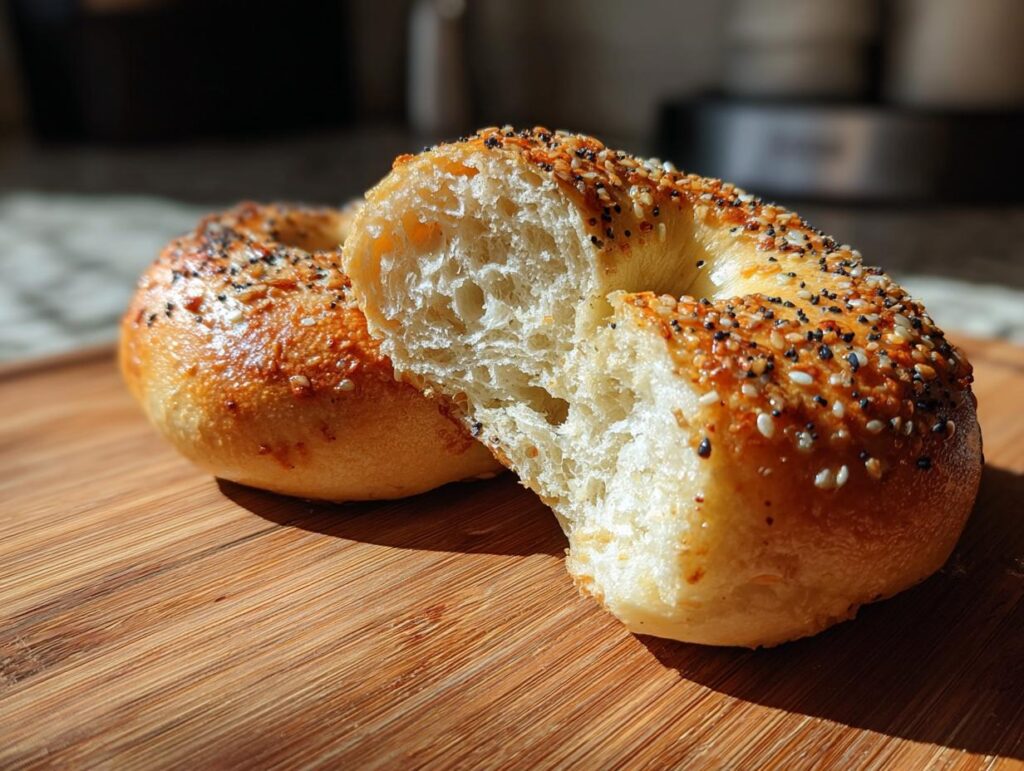
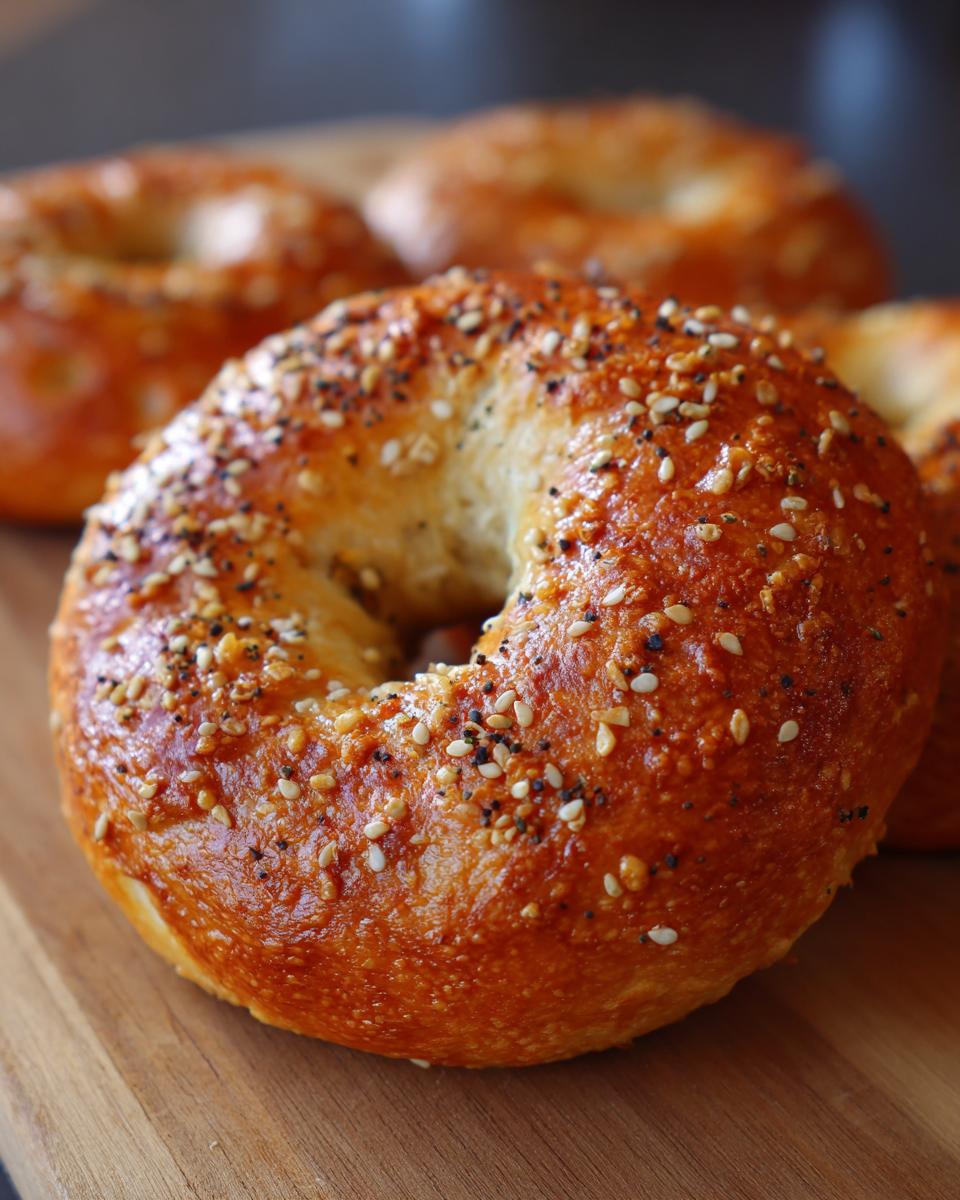
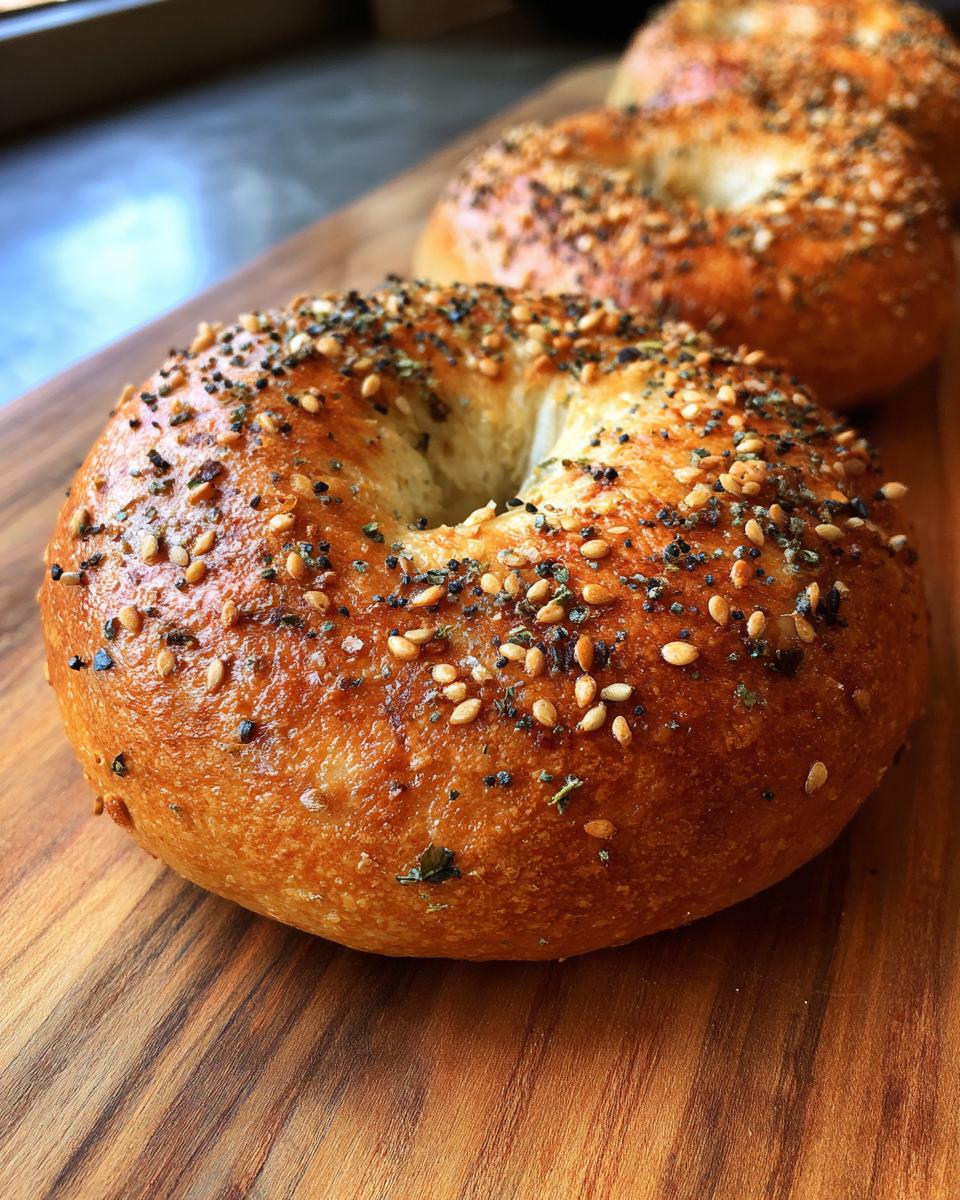
- Seeds of your choice for topping (optional, I love sesame or poppy seeds for a little extra crunch!)
Gather these ingredients, and you’re already halfway to enjoying some delicious homemade bagels!
How to Prepare Protein Bagels
Alright, let’s dive into the delicious world of making Protein Bagels! I promise it’s easier than you might think. Just follow these steps, and you’ll have a batch of warm, hearty bagels in no time!
Preheat and Mix Ingredients
First things first, you’ll want to preheat your oven to 375°F (190°C) or if you’re feeling fancy, set your air fryer to 280°F (140°C). Trust me, this step is crucial because it ensures your bagels bake evenly and get that perfect golden brown finish.
While that’s heating up, grab a large mixing bowl and combine 1 ⅔ cup of whole-wheat flour with 1 ½ teaspoons of baking powder and about ½ to 1 teaspoon of Kosher salt. The baking powder is your secret weapon for a fluffy bagel, so don’t skip it! Now, add in ⅔ cup of Greek yogurt. This is where the magic happens! Stir everything together until it forms a dough. You want it to be a bit shaggy at first, but don’t worry; it’ll come together beautifully when you knead it!
Form the Dough
Now comes the fun part – kneading! Dust your countertop lightly with some flour and transfer your dough onto it. Knead the dough gently for about 2-3 minutes until it feels soft and smooth. If it’s too sticky, sprinkle a little more flour as you go. Once you’ve got a lovely dough ball, divide it into four equal pieces. This part is essential for consistency, so don’t worry about being perfect, but try to keep them roughly the same size for even baking!
Shape the Bagels
Time to shape those bagels! Take one piece of dough and roll it into a log about 6 inches long. Then, bring the ends together to form a ring. Pinch the seams to make sure it holds its shape. Repeat with the other pieces of dough. If you’re feeling creative, you can even make them a bit thicker for a heartier bagel. The key is to keep them uniform in size, so they cook evenly.
Bake or Air Fry
Now, let’s get those bagels cooking! If you’re baking, place your shaped bagels on a parchment-lined baking sheet. If you’re using an air fryer, just pop 2 to 3 bagels in the basket, making sure they’re not overcrowded. Bake in the oven for about 20 to 25 minutes, or air fry for about 15 to 20 minutes until they’re golden brown and smell heavenly. Oh, and don’t forget to give them a little egg wash before baking for that gorgeous shiny finish! Once they’re done, let them cool for about 15 minutes. This waiting time is key to letting the flavors settle and makes them easier to slice!
Nutritional Information Section
Before we dive into the deliciousness, I want to share a little note about the nutrition. Keep in mind that these values can vary based on the specific ingredients and brands you use. So, while I’ve done my best to give you accurate estimates, your results might differ slightly.
Here’s what you can expect in each scrumptious Protein Bagel:
- Calories: 207.8
- Fat: 1.7g
- Saturated Fat: 0.5g
- Unsaturated Fat: 0.9g
- Trans Fat: 0.01g
- Carbohydrates: 37.3g
- Fiber: 1.4g
- Protein: 13.7g
- Sugar: 1.8g
- Sodium: 140.6mg
- Cholesterol: 43.4mg
These bagels are not only filling and delicious, but they also pack a decent punch of protein, making them a fantastic choice for breakfast or a snack on the go!
Tips for Success
Alright, let’s make sure your Protein Bagels turn out absolutely perfect every time! Here are some of my favorite pro tips to help you achieve that delightful texture and flavor.
First off, don’t skip the kneading step! It’s crucial for developing that lovely dough structure. If you’re short on time, a quick knead of 2-3 minutes is enough to bring everything together, but trust me, it makes a difference!
If you want to switch things up a bit, feel free to experiment with the flour. You can use a 1:1 gluten-free flour blend if you’re avoiding gluten, or replace some of the whole-wheat flour with almond flour or protein powder for an extra boost. Just make sure to adjust the liquid slightly if you do.
Another tip is to really watch your baking times. Ovens can vary, so keep an eye on your bagels as they bake until they’re golden brown. And if you’re air frying, don’t overcrowd the basket. This helps them cook evenly and lets that hot air circulate properly.
Lastly, let those bagels cool for at least 15 minutes before slicing. This waiting game is worth it – it allows the texture to set perfectly, making them easier to cut and enjoy. Happy baking!
Variations
Let’s get creative with your Protein Bagels! One of the best parts about this recipe is how easily you can customize it to suit your tastes or use what you have on hand. For instance, try swapping out the whole-wheat flour for a gluten-free blend if that’s your jam. It works like a charm!
If you’re feeling adventurous, why not mix in some herbs or spices? A teaspoon of garlic powder or some chopped fresh herbs like rosemary or dill can elevate your bagels to a whole new level. And don’t forget about toppings! Instead of the usual sesame or poppy seeds, experiment with everything bagel seasoning or even a sprinkle of grated cheese before baking for a savory twist.
Feeling fruity? You could fold in some chopped sun-dried tomatoes or olives for a Mediterranean flair. And if you want to switch up the yogurt, try a flavored Greek yogurt for a hint of sweetness. The possibilities are endless, so let your imagination run wild!
Storage & Reheating Instructions
Now that you’ve made your delicious Protein Bagels, let’s talk about how to keep them fresh and tasty! Storing them properly is key to enjoying that delightful texture and flavor for days to come.
If you plan to eat your bagels within a couple of days, simply keep them at room temperature in a sealed container or a zip-top bag. They’ll stay nice and fresh for about 2 days. Just make sure they’re completely cool before sealing them up, so you avoid any sogginess.
If you want to extend their life a bit longer, pop those bagels in the fridge! They can last for about 4 days in there. Just remember to wrap them in plastic wrap or put them in an airtight container to prevent them from drying out. Nobody wants a stale bagel!
For longer storage, go ahead and freeze them! I love freezing my bagels. Just wrap each one individually in plastic wrap and then place them in a freezer-safe bag. They’ll be good for up to 3 months. When you’re ready to enjoy one, just take it out and let it thaw at room temperature, or pop it in the microwave for about 30 seconds. If you want that fresh-baked vibe, you can also toast them straight from the freezer!
Reheating is super easy! If you prefer a warm, crispy bagel, just slice it in half and toast it in your toaster or toaster oven. If you’re in a hurry, a quick spin in the microwave works too, but it might not get that nice crispy exterior. Either way, you’re in for a treat!
Why You’ll Love This Recipe
There are so many reasons to fall in love with these Protein Bagels! Here’s why they’re a must-try:
- Quick to make: You can whip up a batch in just about 40 minutes, making them perfect for busy mornings!
- Healthy choice: Packed with protein and made with whole-wheat flour, these bagels keep you fuller for longer.
- Versatile: Enjoy them plain, or top them with your favorite spreads like cream cheese, avocado, or even nut butter!
- Customizable: With endless variations, you can easily switch up flavors with different toppings and mix-ins.
- Great for snacks: These bagels make a nutritious snack anytime you need an energy boost!
Trust me, once you try them, they’ll become your go-to recipe for breakfast or a quick snack!
FAQ Section
Got questions about these tasty Protein Bagels? No worries, I’ve got you covered! Here are some common queries I hear from fellow bagel enthusiasts:
Q1: Can I use regular yogurt instead of Greek yogurt?
You can, but I highly recommend sticking with Greek yogurt for this recipe. It’s thicker and has more protein, which really helps achieve that perfect bagel texture. If you need a dairy-free option, feel free to use a thick plant-based yogurt!
Q2: What if I don’t have whole-wheat flour?
No problem! You can substitute it with self-rising flour, which will give your bagels a lovely rise. Just remember to adjust the baking powder since self-rising flour already contains it. If you’re gluten-free, a 1:1 gluten-free flour blend works great too!
Q3: How can I make these bagels taste more savory?
If you’re craving a savory bagel, you can mix in some spices like garlic powder or onion powder into the dough. Also, consider topping them with everything bagel seasoning or even grated cheese for a delicious twist!
Q4: How do I know when my bagels are fully baked?
Great question! Keep an eye on them as they bake – they should turn a lovely golden brown. You can also do the toothpick test; if it comes out clean, your bagels are ready. And don’t forget that cooling time; it helps them set!
Q5: Can I freeze these bagels for later?
Absolutely! These bagels freeze beautifully. Just wrap each one in plastic wrap and store them in a freezer-safe bag. They’ll be good for up to 3 months. When you’re ready to enjoy, simply thaw them at room temperature or toast them straight from the freezer for that fresh-baked taste!
For more recipes follow me in page Facebook and Pinterest.
Print
Protein Bagels: 5 Must-Try Tips for Perfect Mornings
- Total Time: 40 minutes
- Yield: 4 bagels 1x
- Diet: Low Calorie
Description
Protein Bagels are a healthy and filling option for breakfast or snacks.
Ingredients
- 1 ⅔ cup (210 g) whole-wheat flour, or self-rising flour
- ⅔ cup (180 g) Greek yogurt, 5% or 2% fat recommended
- 1 ½ tsp baking powder
- ½ to 1 tsp Kosher salt, or sea salt (optional)
- 1 egg, or one egg white (optional)
- seeds of choice for topping (optional)
Instructions
- Preheat oven to 375°F (190°C) or air fryer to 280°F (140°C).
- Combine flour, baking powder, and salt in a large bowl. Add Greek yogurt and stir until it forms a dough.
- Knead the dough on a floured surface until soft. Divide into 4 pieces.
- Roll each piece into a log about 6 inches long and shape into a ring.
- Brush with egg wash and sprinkle seeds on top, if desired.
- Transfer to a parchment-lined baking sheet and bake for 20 to 25 minutes until golden brown. Cool for 15 minutes before serving.
- For air frying, place 2 to 3 bagels in the basket and air fry for 15 to 20 minutes until golden brown. Cool for 15 minutes before serving.
Notes
- Dairy-free: Use thick plant-based yogurt.
- Gluten-free: Use a 1:1 gluten-free flour blend.
- Low calorie: Use 0% fat Greek yogurt.
- Low carb: Replace some flour with almond flour or protein powder.
- Extra protein: Substitute ½ cup of flour with protein powder.
- Storage: Keep at room temperature for 2 days, in the fridge for 4 days, or freeze for up to 3 months.
- Prep Time: 15 minutes
- Cook Time: 25 minutes
- Category: Breakfast
- Method: Baking or Air Frying
- Cuisine: American
Nutrition
- Serving Size: 1 bagel
- Calories: 207.8
- Sugar: 1.8g
- Sodium: 140.6mg
- Fat: 1.7g
- Saturated Fat: 0.5g
- Unsaturated Fat: 0.9g
- Trans Fat: 0.01g
- Carbohydrates: 37.3g
- Fiber: 1.4g
- Protein: 13.7g
- Cholesterol: 43.4mg
Keywords: Protein Bagels, Healthy Bagels, Greek Yogurt Bagels